
If you are a Shopify Developer and need to migrate all of your data from one store to a new one without the need to pay for a migration app, then I believe this is the article you need to read .
Problem
The problem has been stated above. So let's see what data we have in a store and how we can migrate it to another store:
Product: You can download a CSV file containing product data and upload it to the new store.
With CSV files, information about Collections will not be migrated, so you will need to recreate the Collection data.
Theme: Download the Zip file and upload it to the new store, and the data will remain the same.
Blog posts & custom pages: Use a free app on the Shopify store called ExIm ‑ Export / Import data to migrate.
Assets: These are all the files in your store (which can be viewed in Admin / Settings / Files), including images, videos, and fonts. These are the assets used for theme settings, blog posts, and pages. (Product images and videos are automatically migrated when the CSV file is uploaded!)
And the problem I faced when migrating this asset stack was:
- My store had around ~1000 files, and I couldn't upload them manually.
- After uploading, I had to select the settings of the theme and page to make them work.
If done manually, this would be an exhausting task!
Solution
My solution here is to use the Shopify File API in conjunction with Node.js to download all files and upload them to the new store.
The File API is officially supported by Shopify in API version 2021-07 after the recent Shopify Unite event (information on Shopify Developer Changelog).
The following are the steps that combine manual labor and brainpower to solve these assets
Get all file URLs with GraphQL
Create a Private App
Why create a Private App? Because we need to authenticate with Shopify to request resources in the store. The simplest way is to use Basic HTTP authentication with a Private App. The steps to create a Private App are as follows:
- Go to Store Admin / Apps
- Click Manage private apps (at the bottom of the page) => Create new private app
- Fill in App name and Emergency email in the App details section
- Click Show inactive Admin API permissions in the Admin API section, scroll to the Files section, and select
Read access. - Click => Save => Create app
- That's it, you have created a Private App to authenticate with Shopify.
Get the Access Token
The easiest way to send authenticated requests to Shopify is to add the request header X-Shopify-Access-Token: {access_token}, where {access_token} is the Admin API password of the Private App we just created.
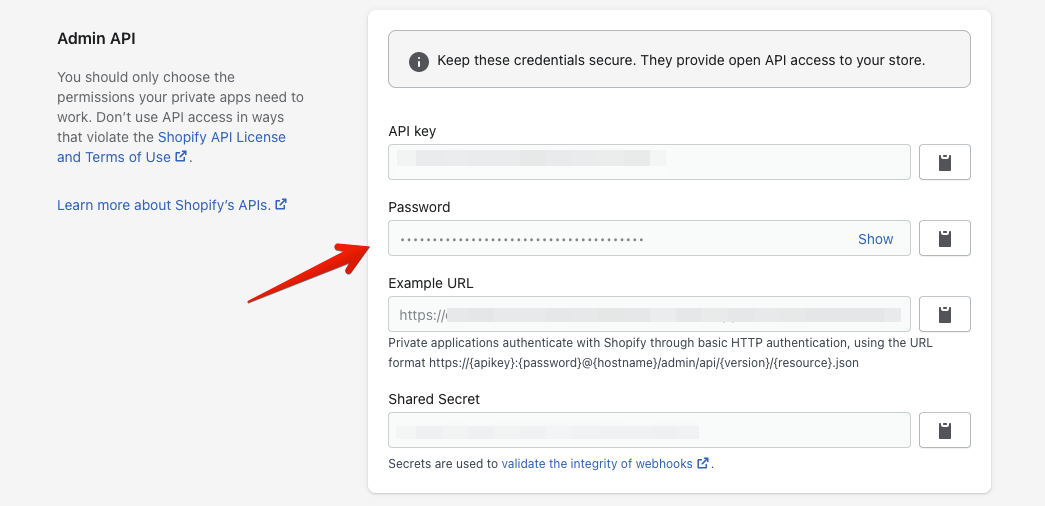
Copy the password in the Admin API section of the Private App you just created; this is the access_token we need for the next step.
Send a GraphQL request with Postman
Because we need to send multiple requests, it's convenient to use an HTTP Client to configure headers and copy responses (such as Postman, Postwoman, Insomnia, etc.). Here, I choose Postman. (Download link here)
After downloading, create a POST request like this:

In which:
Request URL:
https://your-store.myshopify.com/admin/api/unstable/graphql.jsonwithunstableas the API version supporting File API.note: The
Content-Typeheader must use the valueapplication/json, notapplication/graphql(Shopify has note this)The value of the
X-Shopify-Access-Tokenheader is theaccess_tokenorpasswordof the Private App you just created.
Next, switch to the Body tab, select GraphQL
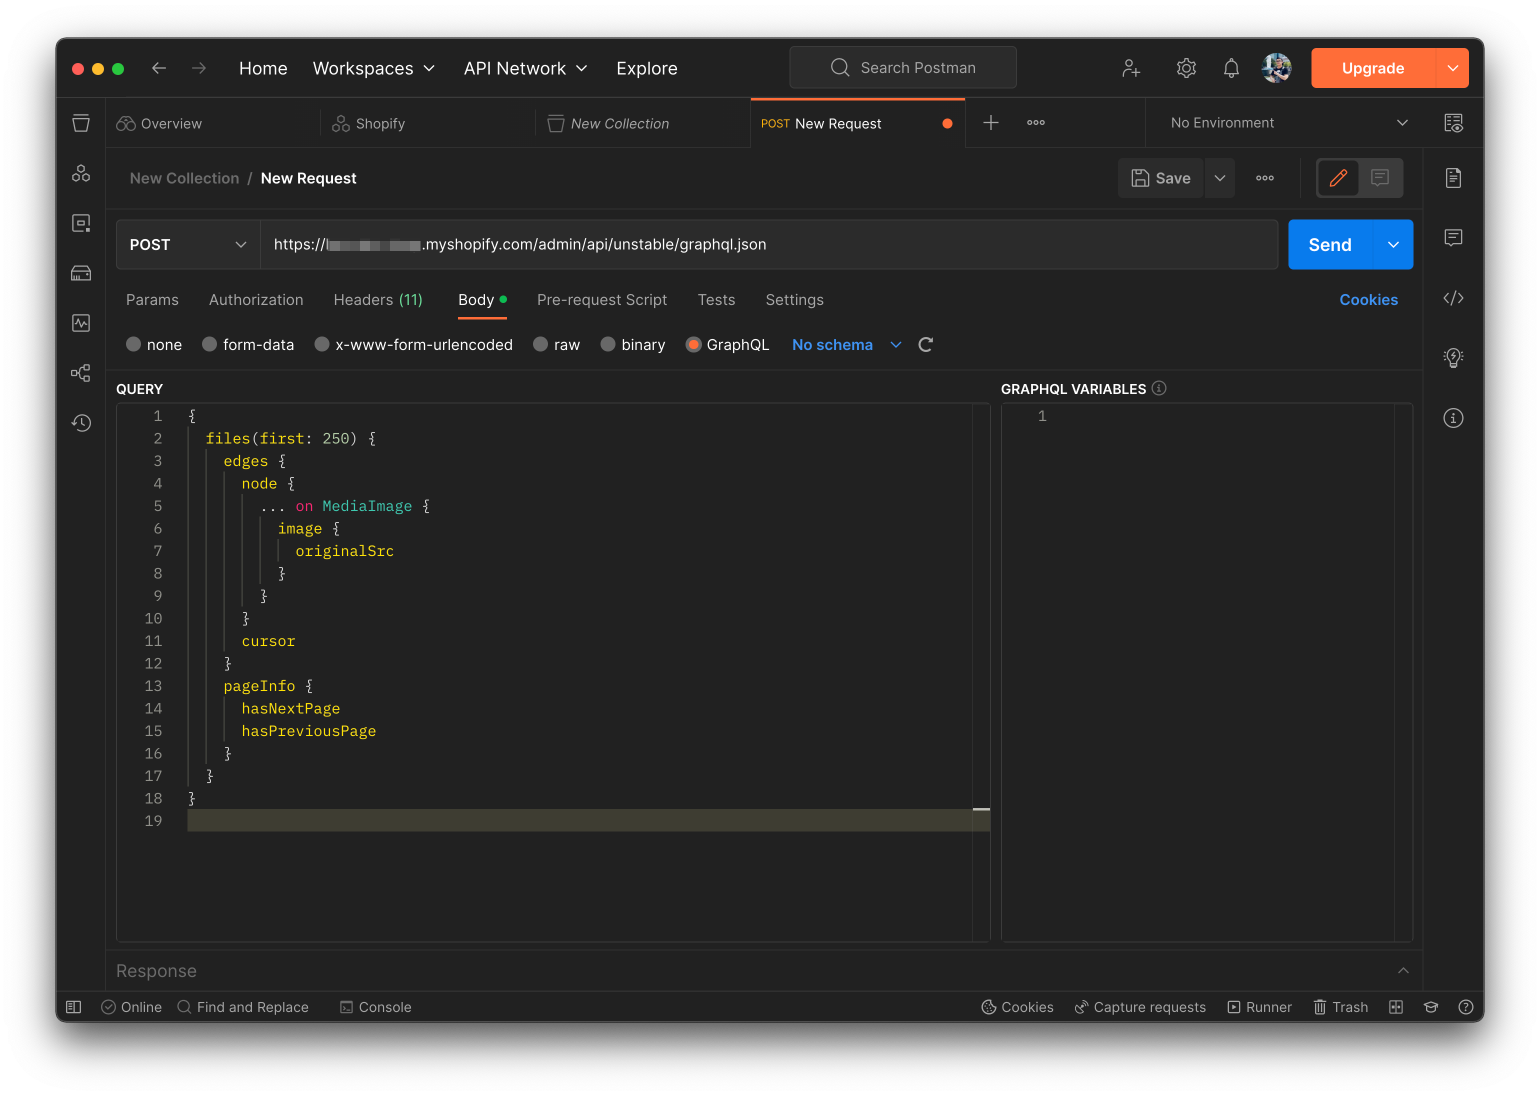
And add the following query
{
  files(first: 250) {
    edges {
      node {
        ... on MediaImage {
          image {
            originalSrc
          }
        }
      }
      cursor
    }
    pageInfo {
      hasNextPage
      hasPreviousPage
    }
  }
}
Each node belongs to one of two types: MediaImage or GenericFile, where GenericFile only has a few files (mostly Fonts), so I'll focus on MediaImage only.
Here are some important notes:
first: 250: is the maximum limit of Shopify for onerequest.cursor: because of the limit, we need to create multiple requests (for example, if my store has ~1000 images, I need 4 requests). The cursor here is the pagination for GraphQL (similar to REST, where you use&page=1,&page=2... to request the next page).pageInfo: It is added only to know if there is a next page or not.
The result will look like this:
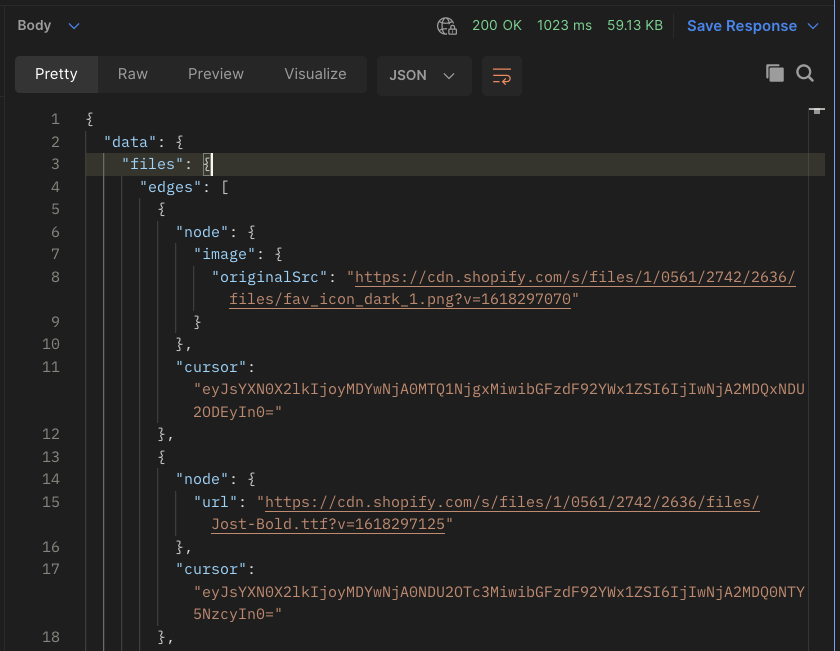
To request the next page, you need to add a query parameter named after with the value of the cursor of the last element in the edges array in the response ( the last element!).

That's all . With 4 requests, I already have 1000 URLs of all the images in the old store!
Download files with Node.js
Now, we need to download all these files and upload them to the new store.
Do we need to choose the settings for this asset again when uploading to the new store ?
The answer is no! Thanks to a very cool mechanism of Shopify!
If you upload a file with the same name as in the old store, it will automatically inherit the settings of the theme/page/blog... that were migrated .
Moreover, the URL of the file obtained with GraphQL already contains the file name: https://cdn.shopify.com/s/files/1/0561/2742/2636/files/fav_icon_dark_1.png?v=1618297070 The file name of this file is fav_icon_dark_1.png.
Now we only need to download the 1000 files, save them with the extracted name from the URL, and upload them to the new store .
With just a few lines of Node.js code combined with regex, we can extract the name and download the file:
let fs = require('fs')
let fetch = require('node-fetch')
let fileData = require('./data')

async function download(url, filename) {
  let response = await fetch(url)
  let buffer = await response.buffer()
  await fs.writeFile(filename, buffer, () => {})
}

console.time('FILE_DOWNLOAD')
Promise.all(
  fileData.map(async ({ node }, ind) => {
    let src = node?.image?.originalSrc
    if (src) {
      let filename = (src.match(/.*\/files\/(.*)\?v=.*/) || [])[1]
      if (filename) {
        await download(src, `./download/${filename}`)
      } else {
        console.warn(`Couldn't get filename of: ${src} at index ${ind}`)
      }
    } else {
      console.log(`No file at index: ${ind}`)
    }
  })
).then(() => console.timeEnd('FILE_DOWNLOAD'))
Note that fileData is the array of edges from the above requests!
The entire script is in this repository.
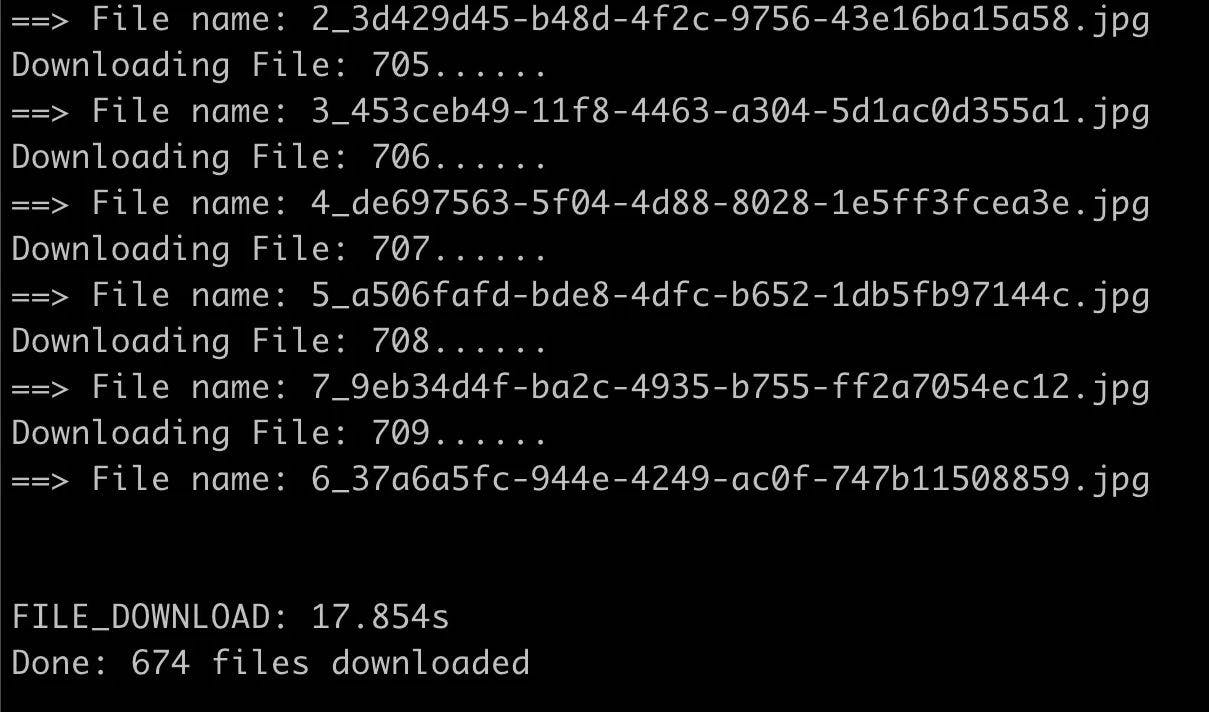
It downloads very quickly!
Upload to the new store
No need to write any code for this step because doing it manually is the fastest way.
Go to Store Admin / Settings / Files => click Upload files. Shopify only allows uploading a maximum of 200 files at a time, so uploading a few times will complete the process!
At this point, the migration process is complete . Check the results on the new store and good luck!
Happy migrating .